
Cleaning inside of gas grill is an important part of keeping your grill safe, efficient, and ready for your next barbecue. Over time, grease, food particles, and carbon buildup collect around the cooking grates, burner covers, firebox, and other internal parts. If you leave this residue untouched, it can cause unpleasant odors, flare-ups, uneven heating, and poor cooking results.
The good news is that you do not need expensive equipment or professional cleaning products to get the job done. With a few basic supplies and the right approach, you can remove stubborn grease and restore your grill’s interior without damaging its components.
This guide explains how to clean inside of gas grill equipment safely, including how to clean the burners, heat tents, cooking grates, and grease tray. You will also learn which cleaning products to use, which mistakes to avoid, and how often to maintain your grill.
Whether you use your gas grill every weekend or only during the summer, these practical tips will help you keep it in good working condition.
Why Cleaning the Inside of a Gas Grill Matters
Regular grill cleaning is about more than appearance. Grease and food residue can affect the way your grill operates and the quality of your food.
Here are the main reasons to clean your grill’s interior regularly.
Reduce Grease Fires and Flare-Ups
Cooking oils, marinades, and meat drippings can collect inside the grill. When these deposits become thick, they may ignite when exposed to high temperatures.
Removing excess grease helps reduce the risk of unexpected flare-ups. However, even a clean grill can experience flare-ups when fatty foods release oil onto hot surfaces, so proper cooking practices are still important.
Improve Cooking Performance
Grease buildup and blocked burner openings can interfere with normal heat distribution. As a result, some areas may become hotter than others, making it harder to cook food evenly.
Cleaning the internal components helps maintain consistent airflow and allows the burners to function as intended.
Prevent Unpleasant Smells and Flavors
Old food particles and burnt grease can produce smoke and unpleasant odors when the grill heats up. These smells may affect the flavor of your food, especially when residue has accumulated over several cooking sessions.
A clean cooking surface and firebox help keep unwanted smoke and odors under control.
Extend the Life of Your Grill
Grease, moisture, and food residue can contribute to corrosion when left on metal surfaces. Regular maintenance allows you to identify rust, damaged burner components, and other problems before they become more serious.
Although cleaning cannot prevent every type of wear, it helps you maintain your investment for longer.
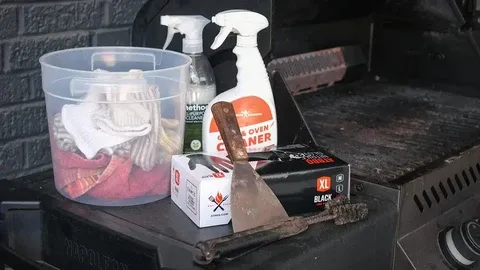
What You Need to Clean Inside a Gas Grill
Before you begin, gather your supplies so you can clean each component without unnecessary interruptions.
You will generally need:
- A grill brush suitable for your grate material
- A plastic or wooden scraper
- A soft sponge or nonabrasive scrub pad
- A microfiber cloth or old cleaning cloth
- A bucket of warm water
- Mild dish soap
- A small, soft-bristled brush
- A disposable container or tray for grease
- Protective gloves, if desired
- The grill manufacturer’s cleaning instructions
You may also use a vacuum designed to handle the type of dry debris you are removing, provided the grill is completely cool and the vacuum is suitable for the task.
Avoid using harsh oven cleaners, strong acids, or abrasive steel wool unless the manufacturer specifically approves them. These products can damage protective coatings, painted surfaces, and certain grill components.
Important: Never clean a grill while it is operating or still dangerously hot. Turn off the burners, shut off the gas supply, and allow the grill to cool completely before disassembling or cleaning its interior.
If you use a propane cylinder, follow the manufacturer’s instructions for shutting off and disconnecting the gas supply when necessary.
how to check a gas grill for leaks
How to Clean Inside of Gas Grill Step by Step
The easiest way to clean a gas grill is to work from the removable cooking components down to the bottom of the firebox. This allows loose debris and grease to fall into areas you can clean later.
Step 1: Turn Off the Grill and Let It Cool
Make sure all burner controls are in the OFF position and shut off the gas supply. If the grill has been used recently, give it enough time to cool completely.
Never remove burner covers, touch burner assemblies, or reach into the firebox while the grill is hot.
Once the grill is cool, open the lid and inspect the interior. Look for thick grease deposits, loose food particles, rust, and signs of damage.
If you notice a strong gas smell, do not start cleaning or operate the grill. Move away from ignition sources and follow the manufacturer’s gas-leak safety instructions.
Step 2: Remove the Cooking Grates
Take out the cooking grates carefully and place them on a protected work surface.
The correct cleaning method depends on the grate material.
Stainless steel grates: Use a suitable grill brush and warm, soapy water to remove food residue. Rinse and dry them thoroughly.
Porcelain-coated grates: Use a soft brush or nonabrasive sponge. Avoid aggressive scraping that could chip the coating and expose the metal underneath.
Cast-iron grates: Follow the manufacturer’s seasoning and cleaning instructions. Avoid soaking them for extended periods because moisture can encourage rust. Dry them thoroughly and apply a thin layer of suitable cooking oil if recommended.
If grease is difficult to remove, let the grates soak briefly in warm, soapy water when the manufacturer permits it.
Do not use a brush with loose or damaged bristles. Metal bristles can separate from the brush and accidentally transfer to food.
Step 3: Clean the Heat Tents or Flavorizer Bars.
Heat tents, also called heat shields or flavorizer bars on some grills, sit above the burners. They help distribute heat and catch drippings before they reach the burner area.
Remove these parts according to your grill’s instructions.
Use a plastic scraper or an appropriate grill brush to remove loose carbon and hardened grease. For stubborn residue, use a soft brush and a small amount of warm, soapy water if the material allows it.
Do not worry if some dark discoloration remains. Heat shields often develop a dark, seasoned appearance during normal use. The goal is to remove excessive grease and loose debris, not to make every surface look brand-new.
Inspect each part for deep rust, holes, warping, or other damage. Replace components that are no longer safe or functional.
Step 4: Clean the Inside of the Firebox
The firebox is the main interior area beneath the cooking grates and heat shields. It often collects ash-like carbon flakes, burnt food particles, and greasy deposits.
Start by scraping loose debris from the interior surfaces. Direct it toward the grill’s designated grease and debris collection area.
Use a plastic scraper rather than a sharp metal tool that could damage the firebox or its protective coating.
For greasy areas, wipe with a damp sponge and mild soapy water if permitted by the manufacturer. Avoid soaking the interior or allowing water to collect around the burners, ignition system, or other sensitive components.
Remove loose debris with a suitable vacuum only when the grill is completely cool, and the appliance is appropriate for the task.
Do not try to remove every dark mark. Some discoloration is normal after repeated exposure to heat. Focus on loose carbon, thick grease, and material that could obstruct components.
Step 5: Clean the Gas Grill Burners Carefully
Burners are among the most important parts of the grill. They produce the flames that heat the cooking surface, so blocked openings can affect performance.
Begin with a visual inspection. Look for rust, corrosion, clogged burner ports, loose connections, or signs of insect nests.
If the manufacturer allows you to remove the burners, follow the instructions carefully. Use a soft brush to remove surface debris.
For clogged burner ports, use only the cleaning method recommended for your model. A suitable soft brush may be enough to clear loose debris. Avoid enlarging the openings with nails, drill bits, or other sharp objects.
Never immerse burner assemblies in water unless the manufacturer specifically permits it. Keep water away from ignition electrodes and other electrical components.
After cleaning, allow all parts to dry completely before reinstalling them.
If the burner is badly corroded, cracked, or producing an irregular flame after cleaning, replace it or have the grill inspected.
Step 6: Empty and Clean the Grease Tray
The grease tray or drip pan collects fat, oil, and cooking residue. If it becomes too full, grease can overflow and create a fire hazard.
Remove the tray according to the manufacturer’s instructions. Dispose of collected grease in a suitable container after it has cooled. Do not pour grease down the drain because it can contribute to plumbing blockages.
Scrape out solidified residue and wash removable trays with warm water and mild dish soap when permitted.
Dry the tray thoroughly before putting it back.
Check the smaller grease cup as well, if your grill has one. Emptying both collection areas regularly helps prevent overflow and makes future cleaning easier.
How to Remove Stubborn Grease From Inside a Gas Grill
Old grease can harden after repeated heating, making it difficult to remove with a cloth alone. Fortunately, you can usually loosen it without using harsh chemicals.
Use Warm Water and Dish Soap
For removable parts that can safely be washed, warm water and a small amount of dish soap help break down ordinary cooking grease.
Allow the residue to soften briefly, then scrub with a suitable nonabrasive brush or sponge.
Rinse thoroughly when appropriate and dry the parts completely before reinstalling them.
Scrape Hardened Deposits Gently
For thick deposits inside the firebox, use a plastic scraper to lift the buildup without damaging the surface.
Work in small sections rather than trying to remove everything at once. Dispose of the loosened debris before wiping the area.
Avoid aggressive scraping around burner openings, ignition components, and delicate coatings.
Avoid Unapproved Cleaning Chemicals
Oven cleaners and heavy-duty degreasers may seem like an easy solution, but they can damage grill materials or leave residues in areas exposed to heat and food.
Use a grill-safe degreaser only when the manufacturer approves it for the specific component. Follow the label directions, rinse as instructed, and allow the part to dry completely.
Never mix cleaning products, especially bleach with ammonia or acidic cleaners.
Common Mistakes to Avoid When Cleaning a Gas Grill
Even a well-intentioned cleaning routine can cause problems if you use the wrong tools or methods.
Avoid these common mistakes:
- Cleaning while the grill is hot: Hot metal can cause serious burns, and cleaning products may react unpredictably with heated surfaces.
- Using excessive water: Water can enter burner openings, ignition systems, and other components that should remain dry.
- Scrubbing coated grates aggressively: Damaged porcelain coatings can expose the underlying metal and shorten the grate’s useful life.
- Ignoring the grease tray: Grease accumulation below the burners can create a significant fire hazard.
- Using sharp objects on burner ports: Enlarging or damaging the openings can affect flame performance.
- Using harsh chemicals without checking the manual: Certain cleaners can damage finishes or leave unwanted residues.
- Reassembling wet components: Trapped moisture can contribute to corrosion and ignition problems.
- Forgetting to inspect the gas connections: Any disconnected gas fitting must be handled and checked according to the manufacturer’s safety instructions.
A careful cleaning routine is more effective than aggressive scrubbing that risks damaging the grill.
Signs Your Gas Grill Needs an Interior Cleaning
Sometimes, a grill needs attention before your usual cleaning date. Watch for these warning signs:
- Heavy smoke even when cooking foods that are not especially fatty
- Strong burnt-grease odors
- Flames that flare up more than usual
- Visible grease collecting beneath the burners
- Thick, loose flakes falling from the lid
- Uneven heating or burner flames that appear abnormal
- A nearly full grease tray
These symptoms can have more than one cause. For example, weak or uneven flames may indicate a gas-supply issue or a damaged burner rather than dirt alone.
How do I know when my gas grill is clean enough?
Your grill is generally ready for use when excessive grease and loose debris have been removed, the grease collection system is clean, the burners and ignition components are in good condition, and all parts have been correctly reinstalled and dried. Normal discoloration from heat does not need to be removed.
Can I use oven cleaner inside my gas grill?
Avoid oven cleaner unless your grill’s manufacturer explicitly approves the product for the specific surface. Many oven cleaners are too harsh for grill components and may damage coatings or leave residues. A suitable grill-safe cleaner is a better choice when ordinary soap and water are not enough.
Conclusion
Cleaning inside of gas grill equipment does not have to be difficult or time-consuming. With regular maintenance, the right cleaning tools, and a careful approach, you can remove grease, clear away loose debris, and keep the important internal components in good condition.
Start by shutting off the gas and allowing the grill to cool completely. Then clean the cooking grates, heat shields, firebox, burners, grease tray, and lid using methods approved for your model. Avoid harsh chemicals, excessive water, and aggressive scrubbing that could damage sensitive parts.
Most importantly, do not wait until heavy grease buildup affects your next barbecue. A little maintenance after regular use makes deeper cleaning easier and helps reduce avoidable flare-ups.
By following these practical steps, you can keep your gas grill cleaner, safer, and ready for your next outdoor meal.